Thursday, October 16, 2014

Cabinet Details. Block logic. Crown molding. Assembly photos.

Remember, back at the beginning, I planned to get rid of the Pale Oaken Death March of the ring of cabinets around three walls. 
Varied height of the three blocks of wall cabinets alleviates monotony.
Given how little the cabinet layout would change, designing each block of wall cabinets as a piece of furniture worked out even better than I anticipated.

Block One 

Before and after.

A better angle.

Block Two

Befores and Afters of the south and north wings of Block Two.

A better angle.

Block Three

Before & After.
Seeing the top of Block Two over Block Three shows how working
through the drama of the crown moldings paid off.


Yes, there was some drama over the crown moldings.

 Block Three is lower and deeper than Block Two. Therefore any coved crown that wrapped around the top of Three would obstruct the right, top door of Two. I thought Leon, the cabinet maker at Scherr's, would have a suggestion for me but he said making all the cabinets the same height was the only way to fix it. I knew I had to come up with another way. So, yeah, there was some slightly awkward phone and email discussion with Leon. All the drama was in my head. As usual.
Perhaps different styles of crown molding on the blocks of cabinets would look right given that I intended to distinguish them from each other. Block Two, after all, was going to be the focal point--that design hero celebrated in song and story. Block Two was supposed to be the most highly distinguished. And it touched the ceiling, so it would need a curved crown whereas the other blocks did not touch the ceiling. 

Almost more than any other issue, the crown kept me awake because I'm not a kitchen designer. I couldn't even find any examples on the internet. But my varied crowns looked good on paper. I just wasn't sure how they would look for real until they were up there, for real and saw how the square complimented the flare. What a relief! 

Square yields to flare and peace ensues
at the intersection of Two and Three.

More photos of cabinets:


And a few views during Cabinet Assembly :

Scherr's Cabinet Assembly.
A cluster of Ikeas, one with a grey-painted back panel.
A standard 30x24 cabinet for the range hood
required some customization


Monday, October 6, 2014

About those Doors: I did it my way.

Preparation:

The first week of April, I tarped my living room to prepare for the arrival of the custom doors from Scherr's,  


My test samples were done. My five-step finishing technique had been worked out in advance. I was ready to go. I knew how to get the finish I wanted, consistently, on those beautiful wood cabinet parts. April was all about wood finishing. April...and then half of May.

Bare naked.


A few weeks after the doors arrived here, the custom cabinet parts arrived. Both the door order and the cabinet order were delivered on pallets. Everything was fork-lifted out of a big truck and deposited into my garage by Carlos Santana, the truck driver. No lie.


The garage held them safely, rain or shine, until I returned from work.
I unpacked the pallets and carried parts in separately.
This is the Grrl Genius way to get things done

The Big One was a combo of the
biggest Christmas present ever
and Dracula's coffin.

The Finishing Technique:

1. Lightly, quickly and thoroughly sand the lovely, reddish wood until smooth. Until. Smooth. While you work, listen to audio books from the library so that your brain does not liquefy and run out of your ears. Wear a good dustmask (not a bandanna, silly) so that your snot does not turn into Elmer's Glue.


Alder is a relatively soft hardwood. Those doors have arrived "pre-sanded," (snort) but the edges are rough in spots and need #220 grit to start. And everything needs #320 to finish. Sand as efficiently as possible. Use sanding blocks to save your hands. When you're finally done sanding, vacuum all dust from the doors, the floors, all tarps and horizontal surfaces. In real cabinet shops, sanding and finish-application happen in different rooms to keep dust out of the finish. I did not have that luxury. Instead, I sanded and applied finish on different days, and I vacuumed and cleaned like a maniac.

2. Wipe every piece with a tack cloth before applying the first coat of finish . (I used a wipe-on, satin polyurethane.) When dry, sand lightly with 320 or 400 grit paper, paying special attention to the corners and edges of the recessed panels which will be roughened from the first coat. This is really tedious work. Keep at it! 

3. Then vacuum and tack cloth again and wipe on a second coat of finish. Do not sand afterward, unless there is a really rough patch.

4. Wipe on, and immediately wipe off "Antique Walnut" gel stain, as a glaze. Yep. I glazed the alder even-though my original inspiration was a natural alder kitchen. I made a test with glaze and it was such an improvement! It was worth the extra work. Unlike the sanding, and most of the varnishing, glazing takes real concentration. It's easy to screw it up!
Natural+Glaze vs. Natural

5. Apply the last coat of finish to seal the glaze.

DIY cabinet finishing disclaimer: Finishing a kitchen full of cabinets is NOT a project for a novice. 

The five steps of the technique (above) are not a how-to guide. Describing everything that I had to do and take care with in the finishing process would take a book of instructions. There are lots of good books out there. I have years of experience in finishing and refinishing hardwood house parts and furniture. If I did not, I never would have attempted this stunt.

Also, factory-made and most shop-made wood cabinetry is finished with a sprayed-on catalyzed varnish that is tougher than the very good quality, wipe-on polyurethane I used. Spray-on finishes can't be used on-site. I don't have a shop; I used poly.

And I was happy to save a lot of money and gain a lot of control over the results with my technique. I have no regrets about doing it my way. Sing it with me! But, I can't encourage anyone else. Proceed at your own risk.


Wednesday, October 1, 2014

7 steps to DIY Hybrid Cabinet Design for Beginners

If--like me--you are not a professional kitchen designer, then designing the cabinet layout means:

  1. Editing your Houzz and Pinterest pages down to the most useful images. 
  2. Cramming into your brain all the kitchen planning advice that time and your intellectual capacity allows.
  3. Putting all of your dreams and inspirations on the table (either physically or figuratively.) 
  4. Knowing (or having a reference for) the cabinet companies' specification and sizes and all of your room dimensions, exactly. Absolutely, for sure, and accurately. And then...
  5. Figuring out the size and shape of every cabinet, panel and filler piece that will fit into the space while elegantly serving your needs and desires. 
  6. Planning exactly how each part attaches to the parts around it. And then...
  7. Checking the total cost of all those pieces to be sure you are within your budget. 
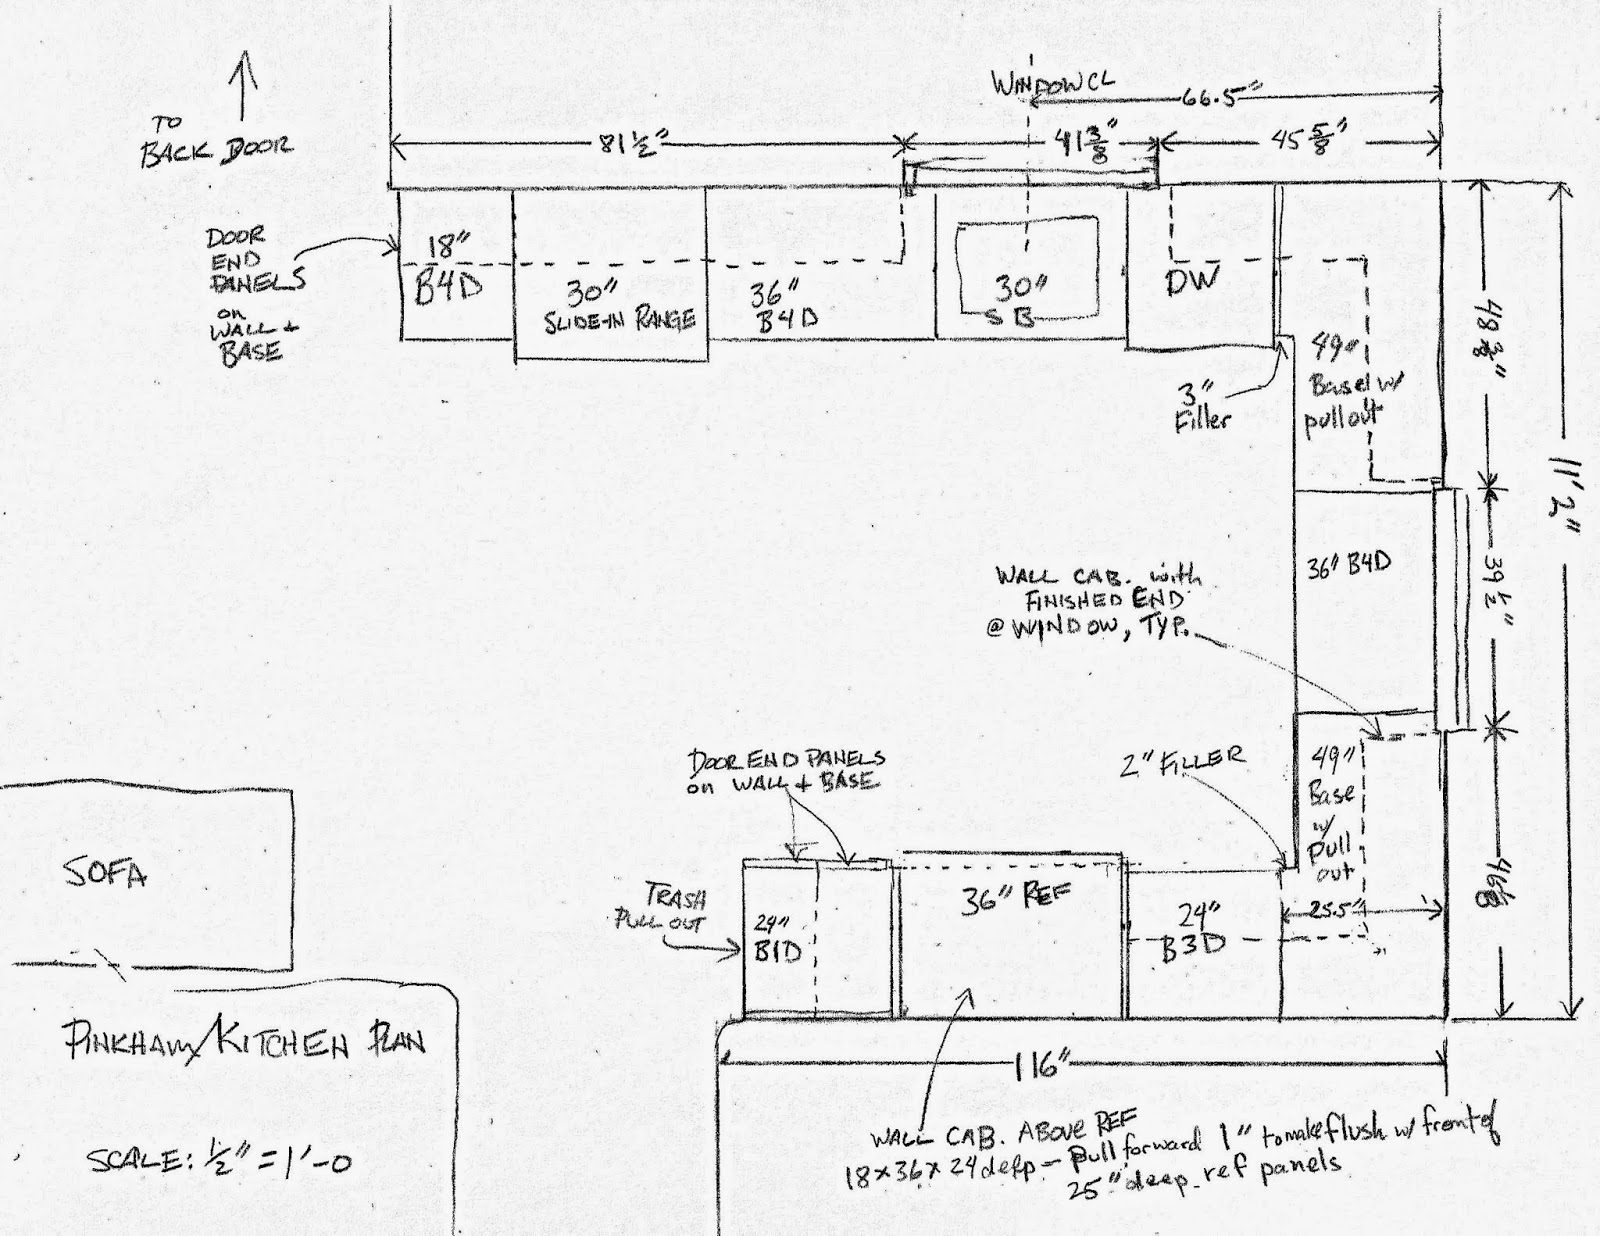

This drawing is here because it is useful; not because it is pretty.

So. Yes. Know what you want. Know what is possible. Know what you can afford. And account for every eighth-inch and every dollar. Until that work is done, the design isn't. (Or, go get some help.)

And then when it is "done," some flaw or potential improvement will wake you in the wee hours or hit you like a fog horn at midday, which will make you go back and revise, revise, revise. Maybe that is only me.

I began working on my design using Ikea's Home Planner 3-D Tool, which is useful and yet far,far, far from perfect. After some hours of frustration, I tried a couple of other nifty CAD systems but there was not time for me to learn a new system before designing my kitchen. I went back to the system I've been using since age four: pencil and paper.
With those tools, a triangle, and my trusty plastic scale, I drew and drew ... until, a couple of months  and many design changes and corrections later, I was ready to order Ikea cabinets, custom doors and additional alder lumber.

Inevitably, I went back and forth between Ikea's program and hand-drawing the floor plans and elevations. Their system is the most direct way to know you can buy the sizes and configurations you want because everything they sell for kitchens is available in the 3D Tool. When you have a design pretty well filled-in, copy it and take all the doors and drawer fronts off the cabinets in the copy design . The Item List function allows you to compare the costs of multiple plans. Talk about inspiration! Wait till you see how cheap (ahem) cost effective those boxes are after you take off the doors and drawer fronts!

 BTW: I assume everyone knows that Ikea will do all of this work for you, if you want. They'll measure, design and install it all .Go over and check it out if you'd like. They try to make it easy for you. (Or, go get some help elsewhere.)

 Which reminds me: If you're doing the design yourself, and also buying custom doors instead of theirs, you will still want to sit down with an Ikea kitchen department person at the store so they can check over your design in their Planner system. They will make sure you have not done something stupid, something that would stop your cabinet installation in its tracks, like thinking you could jam two cabinets into a corner with no fillers.

As I said, Ikea people want to sell their products, and so they really won't be offended if you are doing a hybrid kitchen with custom doors. They only want you to buy their products, not live inside one of their catalogs  In fact, they might even admire your pluck and creativity. They might quietly ask you where you're getting those custom doors because they, too, wouldn't want any of Ikea's doors in their kitchen. They might. Not every Ikea employee drinks the Kool-Aid, you know.


    Friday, September 26, 2014

    A timelapse-ish, progression/photo-essay of a kitchen remodeling summer

     From here on, it's all about the visuals. 

    First an overview, then a post on each individual component.

    1. Overview 


    Remember the Pale Oaken Death March?

     And my winter of Research, Design and Drafting?


    It paid-off in the end....
    All done!
    And in between those...
    In the midst of the demolition.

    Demo and electrical work done.

    Subfloor repaired and underlayment going down


    Bamboo flooring installed!

    Cabinets installed!


    Crown moldings crafted and doors installed

    Steel Gray granite counter tops installed.

    Backsplash tiled, appliances and cat back in place, doors and hardware installed.


    Wednesday, September 24, 2014

    Nail it down: Installing the bamboo floor

     As I suspected all along, removing the vinyl flooring and its underlayment, and repairing the subfloor required many hours of labor. Of course, I did not participate. I cheered on my contractor's employees; I inspected for broken and iffy old 1x6's, chalking X's and question marks onto them in all of the obvious places. I hovered. I took photos from the basement, up through the holes in the subfloor. (And I also worked on other things like making sure my old cabinets were picked up for reuse by The Rebuilding Exchange.)

    John and Nolan, mid-catastrophe.
    Those sleepers (visible in the picture, left, where the man with the shop vac is crouching) had to be removed and sawn down so that a new 3/4" plywood subfloor could be screwed on top of them and made level with the old 1920's, 1x6 subfloor in the rest of the kitchen.

    After the sleepers were tapered and the wonky areas of the 1x6 subflooring were replaced with plywood, every single 1x6 was screwed down at every single joist crossing. Somebody worked late in to the evening to get that done and it made me very happy. I'm just a sucker for structural reinforcement, I guess.


    Black tar paper and thin underlayment applied over subfloor.
    90 year-old lumber, securely affixed
    in place with a bucket of screws.


    Sorry about not having any pictures of the actual installation going on. This extra-hard material needs a skilled installer. My contractor's best carpenter did a meticulous job and the final results are perfect. But right at the beginning, he and I disagreed about how the floor boards were supposed to be staggered. After the issue was resolved by him removing the planks he'd already nailed down, I left him in peace.
    Finished floor.

    And, remember the clearance issue with the swinging door? All that labor to level the old subfloor made possible this perfectly flush transition from old oak in the dining room to new bamboo in the kitchen. 


    Thursday, August 14, 2014

    Selecting The Floor


    A mid-demo view of the meta kitchen's
    eating area.
    In the beginning (circa 1925,) the floor of our house was oak in most places and maple in the original kitchen. There were walls between rooms which have long since been torn down, leaving scars behind. Those were covered in 1949 with composite tile.  In 1994, when we bought this house, we made an addition to the kitchen by enclosing the back porch. We took out the old composite tile and put sheet vinyl over the whole floor; all 390 square feet of it.


    Stuart on the day the countertops were installed, 1994
    Our son Stuart was a year old back then. At first, his baby sitter teased me for damp mopping it every two or three evenings. She said I was in love with my floor. But it was so easy to clean! It looked so clean and shiny afterwards! Can you blame be for getting a little mop-happy? Years of high-drama, tracked-in sand box sand, street grit and serious chair-scraping lay ahead for that vinyl.


    Reuse, Reduce, Recycle

    Floors are like any other part of a building. The most environmentally responsible option is always keeping what you have. It may sound like tearing down a 20th century house to build an energy efficient, solar-and-wind powered house out of sustainably sourced products is a fabulously green plan. It is not. There is a tremendous amount of energy stored in that old house. Even disassembling and recycling the building materials consumes a huge amount of energy. It is almost always greener to remodel and retro-fit the old house. I'm not saying, "Never tear down an old house!" I would never judge someone harshly for doing anything so completely wonderful and exciting as building a brand new LEED certified home.  Just don't kid yourself. New houses create an unavoidable environmental debt. Old houses have long-since paid off that debt and they get a little greener every day you live in one.
    Armstrong Congoleum Vinyl, 1994-2014

    Pardon my Digression. Back to the Floor...


    So with an old floor, you can buff or sand it if it's hardwood; strip, scrub and buff if it's tile or a composite. But some floors can't be saved. Not only had our family sucked the useful life out of our kitchen floor, the foot print of the cabinets was going to change with the remodeling, exposing areas that had never had vinyl flooring. Keeping the existing flooring was out for me.


    The next greenest flooring is a recycled material such as recycled rubber or reclaimed wood. After that, probably comes linoleum. which has long been made of linseed oil, rosin, powdered cork and pigments pressed into a jute backing. While largely replaced by and confused with composite vinyl flooring since the 1940's, linoleum is still made and sold under the brand names of Marmoleum and Marmorette. All last winter, I was convinced we'd install a linoleum floor in our kitchen.
    A truly fine linoleum installation.

    I researched online. I visited showrooms and talked to showroom guys about the installation process and costs for linoleum. I eventually sussed-out that installers don't really want to lay tile or sheet flooring with adhesive any more. They'd much rather install a floating floor where the pieces click together. It's faster and easier for them. One show room guy was postively gleeful about how quick and simple it was. And since the consumer pays the same installation fee per square foot, I completely understand why he was gleeful: Lower labor costs and higher profits. But what's in it for me? The estimate he gave me for either a glued-down, linoleum tile floor, or a floating, linoleum click-floor was $5,000. That's a lot. It seemed like I'd do better elsewhere.

    Back to the Interwebs!

    Maybe now is the time to let you know about two critical factors in my flooring search.

    The First Factor: Clearance

     As I mentioned some time ago, last summer I stripped and refinished all of the interior doors on the main floor of our house. One of those is a swinging door between the kitchen and the dining room.

    Swinging doors are hinged with pins at the top and bottom edges. The pins fit into plates in the top of the door jamb and in the floor. That dirty metal plate around the bottom, hinged side of the door (visible in the mid-stripping photo above, right,) conceals a spring mechanism that allows the door to SWING, SWING, swing, swing and come to rest in the closed position. You can see why the door can't be cut and made shorter to accommodate a thicker floor, right? You can't cut either the top or the bottom of the door. The door above could swing into the kitchen and clear the quarter inch of underlayment and the 3/16th of the sheet vinyl on the floor with maybe another quarter inch to spare. Therefore, a thicker, click-floor wouldn't work in this room; not with the door there. And I would never sacrifice that door. Repeating those facts seemed to make no impression on the salesman who tried to sell me his click flooring products. Every time I mentioned the swinging door clearance issue he waved his hand, as if this was a mere detail his installation crew would easily solve. He could not explain how. I walked out laughing.

    The only solution I could think of was to remove the original maple and oak flooring in the entire kitchen, take out the plywood under the floor in the addition and somehow make all that level. But if I were going to pay for all that, I could put down any flooring I wanted. And if I was going to pay for all that, the floor I would select was going to be very, very strong.

    The Second Factor: Sledgehammers in Sneakers

    If you didn't know me before this blog then you probably don't know that Stuart has autism. I wish there was a shorthand way for us to smile and nod at each other and move on to his effect on floors. Briefly: He's 21 years old now and he is, as he has always been, my beloved, funny, charming kid. Yes, he's happy and doing well Yes, we had to face the challenges of finding therapy, schooling and services for him. No, we did not get much sleep during his childhood. I've written about him and my experiences as his mother elsewhere. No, he did not "progress" in therapy as much as we hoped he would, but we have been extremely fortunate in finding good support and services for him with PACTT Learning Center. Hey, look! Here's my favorite photo of Stuart:
    And here's a link to a PACTT video about the need for support and services for him and his friends.

    Like a lot of people with autism, intense emotions such as frustration, disappointment and even pure excitement can overwhelm Stuart. Sometimes, despite his best efforts to control himself, he releases the emotions loudly, energetically and physically with destructive force. He's much better at controlling himself than he once was, but these outbursts of behavior are still a defining condition of his life. He used to do a lot of damage to walls, and he still can, but he tries to avoid that by jumping, with feet spread apart and knees bent, like a sumo-wrestler, bringing his feet down as hard as he can. Sledgehammers in sneakers. I need a floor that can take it.

    Pardon my digression, again.

    Selecting Bamboo Flooring for Resilience

    Ultimately, bamboo flooring beat all the others. It's harder and more sustainably produced than traditional hardwoods such as maple and oak. Except, in my research, I found that that the issues of durability and "green-ness" of the product were complicated.. I highly recommend taking the time to do research and  paying the small cost of buying samples. These were important factors in my decision. Here's some of what I learned:
    1.  Most bamboo plank flooring sold in the US is grown and manufactured in China where forests have been cut down to grow our bamboo.
    2.  Most bamboo from China has formaldehyde added in the manufacturing process. .
    3. Types of plank bamboo in order of increasing durability: Carbonized, Horizontal Grain,Vertical Grain,  and Strand bamboo.
    4. The quality of bamboo flooring varies between manufacturers. The cheap stuff is not just-as-good as the more expensive stuff. That's why buying samples is so important. 
    5. Since bamboo is a grass, all bamboo flooring material is composed of bamboo held together by resins. By itself, the only really hard part of bamboo is the outside of the stalk. Stranded bamboo flooring (or "strand-woven" ) is made from separated fibers of bamboo combined with those tough resins and compressed into an extremely dense plank. It is the hardest, most resilient, bamboo flooring.
    It turns out that buying a good floor is a lot like love: When it's right, you just know it. When I held Cali Bamboo's strand-woven bamboo in my hand and compared it with two comparable products, it was the obvious winner. It was heavier, denser and better-finished. The tongues and the grooves were smoother. It still took many calls and questions to Cali Bamboo's salesman, and many months for me to commit. You know how love is: Scary as hell!


    Wednesday, August 13, 2014

    Catching up in the kitchen.

    Oh my. It has been a long while.

    As soon as the actual construction started on May 19th, my everyday routine became a race. Not like a marathon where you do the whole thing in one day, but more like the Tour de France with daily stages to complete. But holy crap, those mountains! I couldn't keep up.

    L>R: Backlog, Ongoing, Clean-up, Complete
    My mistake was thinking I could do my portions of the work in the mornings before the contractor's crew arrived and in the evenings after they left. Trouble was, in between patching and painting walls at dawn or assembling cabinetry after dark, I did not slow down and rest in the middle of the day. After a month of working from 5 a.m. until 9 p.m. on weekdays, and long days on the weekends, I wiped out. I lost a week to an illness; a major body infection. You do not want the details. I had to slow down. And that's how this blog fell off my Kanban Board.
    By now, the base kitchen has been functioning for a month. Although there are still ongoing projects. I'm about to install reclaimed wood shelves in the meta kitchen. And the wall colors in the dining room and adjacent bathroom are all wrong with the new kitchen; I'll have to repaint them very soon.  But I have survived, and my children and husband are still alive, so let's declare victory and catch-up on what happened, starting with the floor.