Thursday, October 16, 2014

Cabinet Details. Block logic. Crown molding. Assembly photos.

Remember, back at the beginning, I planned to get rid of the Pale Oaken Death March of the ring of cabinets around three walls. 
Varied height of the three blocks of wall cabinets alleviates monotony.
Given how little the cabinet layout would change, designing each block of wall cabinets as a piece of furniture worked out even better than I anticipated.

Block One 

Before and after.

A better angle.

Block Two

Befores and Afters of the south and north wings of Block Two.

A better angle.

Block Three

Before & After.
Seeing the top of Block Two over Block Three shows how working
through the drama of the crown moldings paid off.


Yes, there was some drama over the crown moldings.

 Block Three is lower and deeper than Block Two. Therefore any coved crown that wrapped around the top of Three would obstruct the right, top door of Two. I thought Leon, the cabinet maker at Scherr's, would have a suggestion for me but he said making all the cabinets the same height was the only way to fix it. I knew I had to come up with another way. So, yeah, there was some slightly awkward phone and email discussion with Leon. All the drama was in my head. As usual.
Perhaps different styles of crown molding on the blocks of cabinets would look right given that I intended to distinguish them from each other. Block Two, after all, was going to be the focal point--that design hero celebrated in song and story. Block Two was supposed to be the most highly distinguished. And it touched the ceiling, so it would need a curved crown whereas the other blocks did not touch the ceiling. 

Almost more than any other issue, the crown kept me awake because I'm not a kitchen designer. I couldn't even find any examples on the internet. But my varied crowns looked good on paper. I just wasn't sure how they would look for real until they were up there, for real and saw how the square complimented the flare. What a relief! 

Square yields to flare and peace ensues
at the intersection of Two and Three.

More photos of cabinets:


And a few views during Cabinet Assembly :

Scherr's Cabinet Assembly.
A cluster of Ikeas, one with a grey-painted back panel.
A standard 30x24 cabinet for the range hood
required some customization


Monday, October 6, 2014

About those Doors: I did it my way.

Preparation:

The first week of April, I tarped my living room to prepare for the arrival of the custom doors from Scherr's,  


My test samples were done. My five-step finishing technique had been worked out in advance. I was ready to go. I knew how to get the finish I wanted, consistently, on those beautiful wood cabinet parts. April was all about wood finishing. April...and then half of May.

Bare naked.


A few weeks after the doors arrived here, the custom cabinet parts arrived. Both the door order and the cabinet order were delivered on pallets. Everything was fork-lifted out of a big truck and deposited into my garage by Carlos Santana, the truck driver. No lie.


The garage held them safely, rain or shine, until I returned from work.
I unpacked the pallets and carried parts in separately.
This is the Grrl Genius way to get things done

The Big One was a combo of the
biggest Christmas present ever
and Dracula's coffin.

The Finishing Technique:

1. Lightly, quickly and thoroughly sand the lovely, reddish wood until smooth. Until. Smooth. While you work, listen to audio books from the library so that your brain does not liquefy and run out of your ears. Wear a good dustmask (not a bandanna, silly) so that your snot does not turn into Elmer's Glue.


Alder is a relatively soft hardwood. Those doors have arrived "pre-sanded," (snort) but the edges are rough in spots and need #220 grit to start. And everything needs #320 to finish. Sand as efficiently as possible. Use sanding blocks to save your hands. When you're finally done sanding, vacuum all dust from the doors, the floors, all tarps and horizontal surfaces. In real cabinet shops, sanding and finish-application happen in different rooms to keep dust out of the finish. I did not have that luxury. Instead, I sanded and applied finish on different days, and I vacuumed and cleaned like a maniac.

2. Wipe every piece with a tack cloth before applying the first coat of finish . (I used a wipe-on, satin polyurethane.) When dry, sand lightly with 320 or 400 grit paper, paying special attention to the corners and edges of the recessed panels which will be roughened from the first coat. This is really tedious work. Keep at it! 

3. Then vacuum and tack cloth again and wipe on a second coat of finish. Do not sand afterward, unless there is a really rough patch.

4. Wipe on, and immediately wipe off "Antique Walnut" gel stain, as a glaze. Yep. I glazed the alder even-though my original inspiration was a natural alder kitchen. I made a test with glaze and it was such an improvement! It was worth the extra work. Unlike the sanding, and most of the varnishing, glazing takes real concentration. It's easy to screw it up!
Natural+Glaze vs. Natural

5. Apply the last coat of finish to seal the glaze.

DIY cabinet finishing disclaimer: Finishing a kitchen full of cabinets is NOT a project for a novice. 

The five steps of the technique (above) are not a how-to guide. Describing everything that I had to do and take care with in the finishing process would take a book of instructions. There are lots of good books out there. I have years of experience in finishing and refinishing hardwood house parts and furniture. If I did not, I never would have attempted this stunt.

Also, factory-made and most shop-made wood cabinetry is finished with a sprayed-on catalyzed varnish that is tougher than the very good quality, wipe-on polyurethane I used. Spray-on finishes can't be used on-site. I don't have a shop; I used poly.

And I was happy to save a lot of money and gain a lot of control over the results with my technique. I have no regrets about doing it my way. Sing it with me! But, I can't encourage anyone else. Proceed at your own risk.


Wednesday, October 1, 2014

7 steps to DIY Hybrid Cabinet Design for Beginners

If--like me--you are not a professional kitchen designer, then designing the cabinet layout means:

  1. Editing your Houzz and Pinterest pages down to the most useful images. 
  2. Cramming into your brain all the kitchen planning advice that time and your intellectual capacity allows.
  3. Putting all of your dreams and inspirations on the table (either physically or figuratively.) 
  4. Knowing (or having a reference for) the cabinet companies' specification and sizes and all of your room dimensions, exactly. Absolutely, for sure, and accurately. And then...
  5. Figuring out the size and shape of every cabinet, panel and filler piece that will fit into the space while elegantly serving your needs and desires. 
  6. Planning exactly how each part attaches to the parts around it. And then...
  7. Checking the total cost of all those pieces to be sure you are within your budget. 


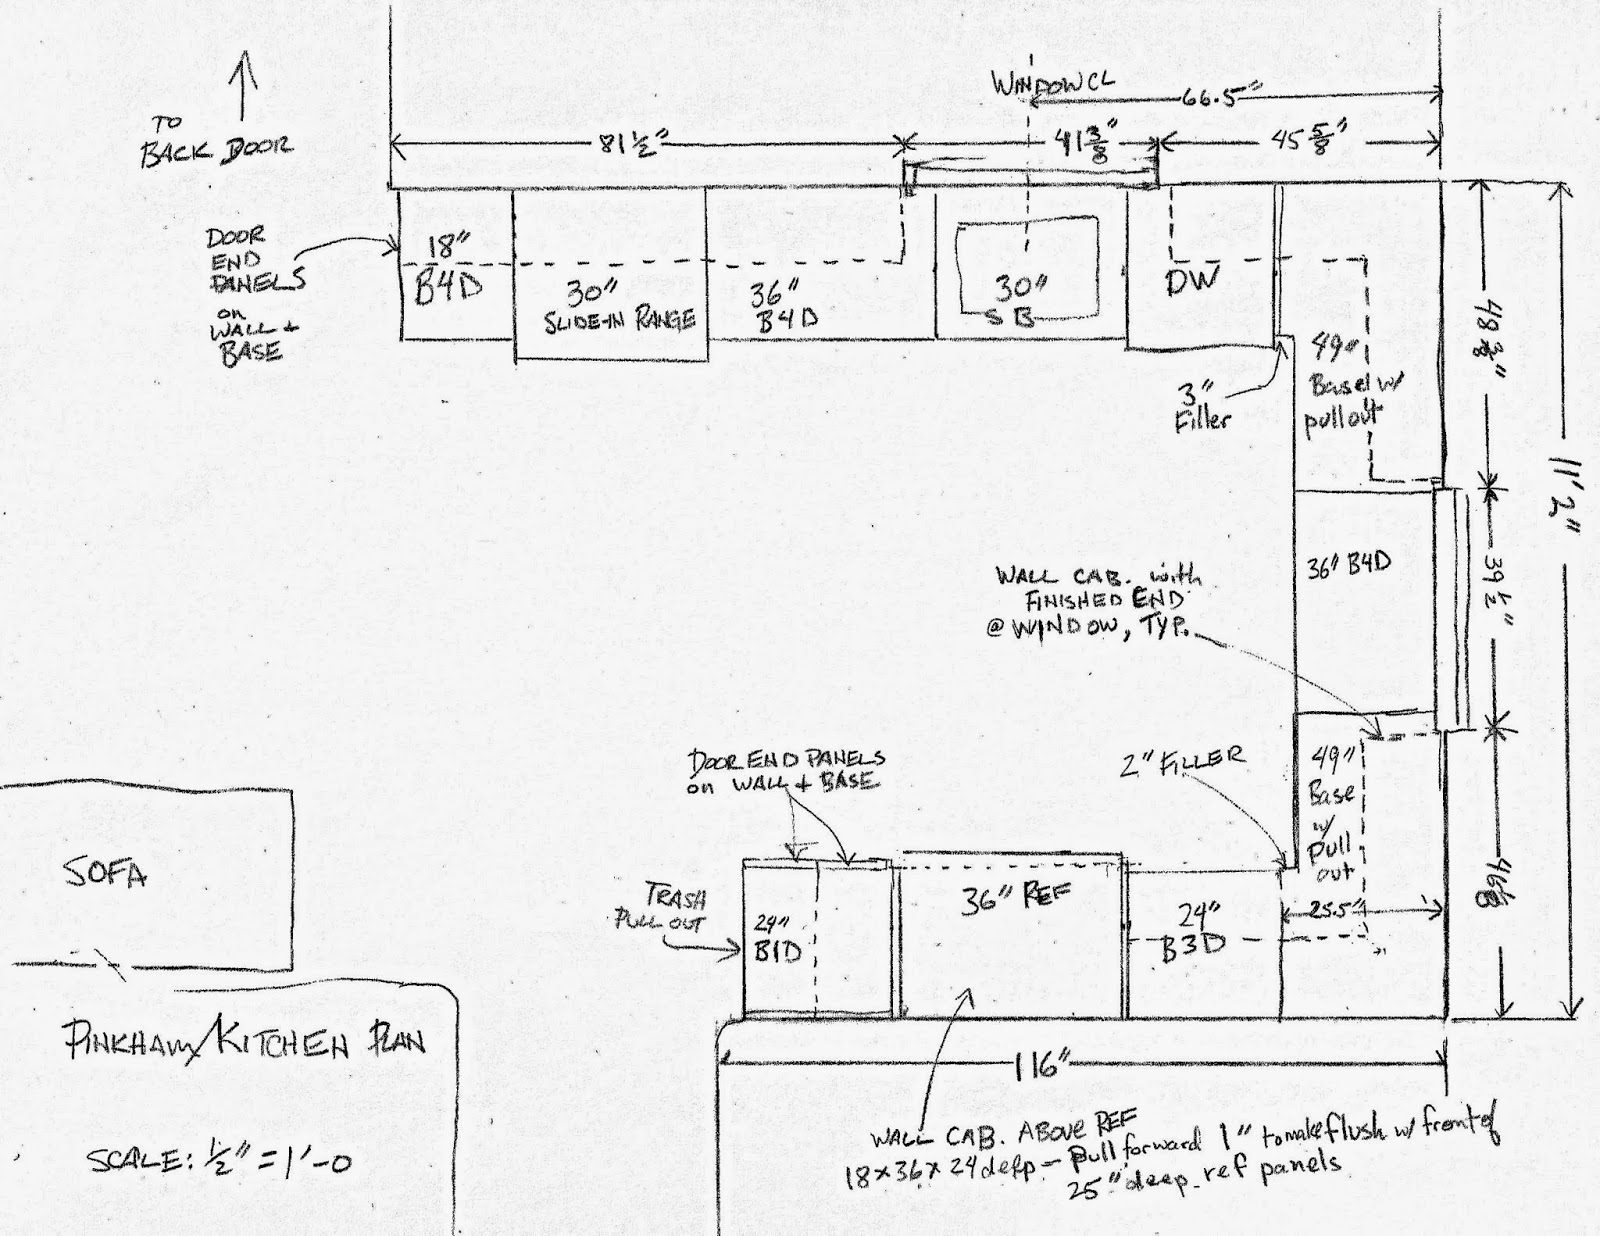
This drawing is here because it is useful; not because it is pretty.

So. Yes. Know what you want. Know what is possible. Know what you can afford. And account for every eighth-inch and every dollar. Until that work is done, the design isn't. (Or, go get some help.)

And then when it is "done," some flaw or potential improvement will wake you in the wee hours or hit you like a fog horn at midday, which will make you go back and revise, revise, revise. Maybe that is only me.

I began working on my design using Ikea's Home Planner 3-D Tool, which is useful and yet far,far, far from perfect. After some hours of frustration, I tried a couple of other nifty CAD systems but there was not time for me to learn a new system before designing my kitchen. I went back to the system I've been using since age four: pencil and paper.
With those tools, a triangle, and my trusty plastic scale, I drew and drew ... until, a couple of months  and many design changes and corrections later, I was ready to order Ikea cabinets, custom doors and additional alder lumber.

Inevitably, I went back and forth between Ikea's program and hand-drawing the floor plans and elevations. Their system is the most direct way to know you can buy the sizes and configurations you want because everything they sell for kitchens is available in the 3D Tool. When you have a design pretty well filled-in, copy it and take all the doors and drawer fronts off the cabinets in the copy design . The Item List function allows you to compare the costs of multiple plans. Talk about inspiration! Wait till you see how cheap (ahem) cost effective those boxes are after you take off the doors and drawer fronts!

 BTW: I assume everyone knows that Ikea will do all of this work for you, if you want. They'll measure, design and install it all .Go over and check it out if you'd like. They try to make it easy for you. (Or, go get some help elsewhere.)

 Which reminds me: If you're doing the design yourself, and also buying custom doors instead of theirs, you will still want to sit down with an Ikea kitchen department person at the store so they can check over your design in their Planner system. They will make sure you have not done something stupid, something that would stop your cabinet installation in its tracks, like thinking you could jam two cabinets into a corner with no fillers.

As I said, Ikea people want to sell their products, and so they really won't be offended if you are doing a hybrid kitchen with custom doors. They only want you to buy their products, not live inside one of their catalogs  In fact, they might even admire your pluck and creativity. They might quietly ask you where you're getting those custom doors because they, too, wouldn't want any of Ikea's doors in their kitchen. They might. Not every Ikea employee drinks the Kool-Aid, you know.